The Complete Guide to Your Dream Garage Gym Setup
Are you tired of the drive to the gym? Do you dread the crowded peak hours and the monthly fees that never end? There is a better way. A home gym in your garage is the ultimate solution. It gives you control, convenience, and saves you money. This guide will walk you through every step of your **garage gym setup**. We will cover everything from your concrete floor to your final cleanup. By the end, you will know exactly how to build the training space you have always wanted.
Why does a home gym work so well? Research shows that easy access to your workout environment is a key factor in sticking to an exercise routine. Removing the travel barrier makes success much more likely. And let’s talk cost. The average gym membership costs between $40 and $70 per month. That’s $500 to $800 a year. A smart initial investment of $1,500 in your own **garage gym setup** can pay for itself in just 2-3 years. After that, you get decades of “free” workouts.
This guide is broken into five simple phases. We will start with planning your space. Then, we will cover flooring, equipment, organization, and budget. Let’s build your dream home gym.
Phase 1: Strategic Planning & Space Assessment
Success starts with a solid plan. Skipping this step leads to wasted money and a gym that doesn’t work well. Your first job is to understand your space.
Step 1: Measure & Audit Your Space
Grab a tape measure and a notepad. You need three numbers: length, width, and height. Write them down. Next, note the location of all doors, windows, electrical outlets, and the garage door opener. Pay special attention to low-hanging items like the door opener rail. This is the crucial first step for any small garage gym setup. Knowing your exact dimensions stops you from buying equipment that doesn’t fit.
Step 2: Establish Safety & Clearance Zones
Safety is the most important rule. You must have enough room to move and to fail safely. The National Strength and Conditioning Association (NSCA) provides clear safety guidelines. For a power rack, you need a minimum of 12-16 square feet of clear space on all sides. This is for safe barbell ejection and movement.
Think about the “workout radius” for each activity:
- Olympic Lifts: You need space for the bar to move in an arc overhead without hitting anything.
- Dumbbell Work: Your arms need to swing out to the sides without hitting walls or other gear.
- Functional Training: Movements like kettlebell swings need a wide, clear circle.
Source: National Strength and Conditioning Association (NSCA) Safety Guidelines – https://www.nsca.com/education/articles/kinetic-select/safety-guidelines-for-strength-and-conditioning/
Step 3: Design Your Layout & Zones (Garage Gym Layout Ideas)
Now, let’s design the layout. Great garage gym layout ideas are all about zoning. You divide your space into functional areas, even if it’s just a single bay. This makes your training more efficient.
The Three Main Zones:
- Strength/Power Rack Zone: This is the heart of your gym. It houses your rack, barbell, plates, and bench.
- Cardio/Functional Zone: This area is for dynamic movement. It could hold a rower, bike, sled, or space for jump ropes and medicine ball slams.
- Flex/Mobility Zone: This is your cool-down area. It needs space for a yoga mat, foam roller, and stretching.
Design a logical traffic flow. Start at the mobility zone for a warm-up. Then move to the strength zone for your main lifts. Finish with cardio or more mobility work. This prevents you from crossing your own path mid-workout.
For a small garage gym setup, use “micro-zoning.” This means one space serves multiple purposes. Your squat rack area can also be your stretch area. Always choose multi-functional equipment and use your vertical wall space for storage.
Phase 2: The Foundation: Choosing Your Garage Gym Flooring
Your floor is not just decoration. It is essential for protection, safety, and performance. A good floor protects your concrete slab from cracks. It also protects your weights and bars from damage when dropped.
The 3 Critical Roles of Gym Flooring:
- Protection: It shields your concrete and equipment from impact damage.
- Safety: It provides shock absorption and slip resistance to prevent injuries.
- Performance: It offers a stable, consistent surface for lifting, which is crucial for power and balance.
Exploring Garage Gym Flooring Options
You have three main choices for your training space floor. Let’s look at each one.
Horse Stall Mats (3/4″ Rubber):
These are the industry standard for home gyms. They are incredibly dense and durable, designed to handle the impact of large animals. This makes them perfect for dropping heavy weights.
- Pros: Most cost-effective per square foot. Extremely durable and long-lasting.
- Cons: Very heavy and hard to move. They can have a strong rubber smell at first. They require cutting and seaming to fit your space.
Interlocking Tiles:
These are puzzle-piece tiles you snap together.
- Pros: Easy do-it-yourself installation. Easy to replace a single tile if damaged. Good for uneven floors.
- Cons: Higher cost per square foot. Tiles can shift under very heavy, concentrated loads if the edges aren’t secured.
Rolled Rubber:
This comes in big rolls, like carpet.
- Pros: Creates a seamless, professional look with no gaps.
- Cons: Very difficult DIY installation. Requires precise measurement and special tools to seam rolls together. Best for large, open areas.
Determining the Best Flooring for Garage Gym Use
So, what is the best flooring for garage gym training? The consensus is clear. For strength training with heavy weights, 3/4-inch thick rubber flooring is the winner. Horse stall mats provide the best mix of low cost, high durability, and protection. Thinner mats (less than 1/2 inch) are not recommended. They won’t absorb enough shock.
A biomechanical study on impact attenuation supports this. It found that proper flooring thickness is critical for reducing force on the body and preventing injury. Your floor is a safety device. Source: “Biomechanical Evaluation of Flooring Systems for Injury Prevention” – *Journal of Applied Biomechanics* – https://journals.humankinetics.com/view/journals/jab/35/4/article-p298.xml
Installation Tip: Before you lay down any mats, check your concrete for moisture. Let the mats air out for a few days if they smell. Place them tightly together and use specialized rubber mending tape or adhesive for the seams.
Phase 3: Curating Your Garage Gym Equipment List
Your gear must match your goals, space, and budget. Don’t buy everything at once. Start with the essentials, then expand over time. This is called the principle of specificity. Your equipment should serve your specific training goals: strength, muscle building, conditioning, or general fitness.
Garage Gym Essentials (The Non-Negotiables)
These are the garage gym essentials. You can build a highly effective training routine with just these items.
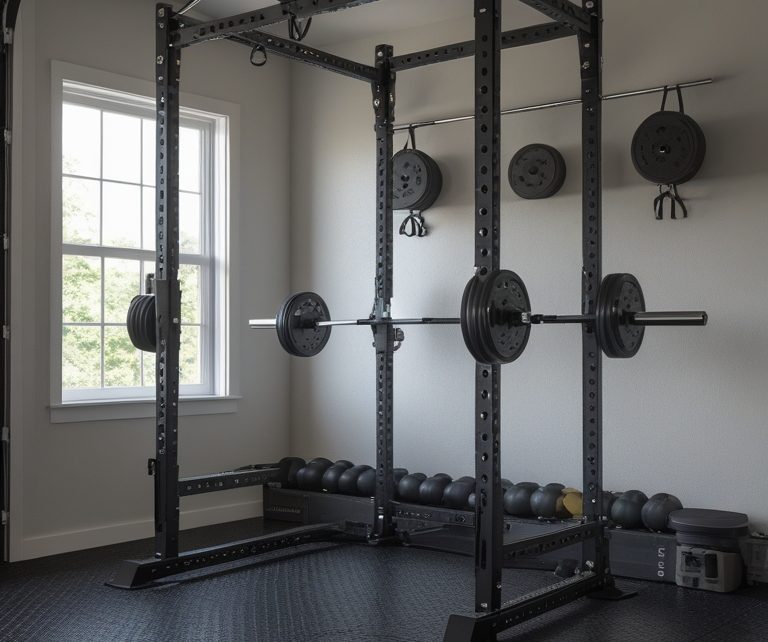
- Power Rack or Squat Stand: This is the cornerstone of a safe home gym. It allows you to train alone safely by catching failed lifts on the safety bars or straps. It is the anchor of your entire workout space.
- Adjustable Bench: Don’t skimp here. You need a stable, firm bench that won’t compress under weight. This is vital for proper mechanics and safety during presses.
- Barbell & Plates: This is the most efficient tool for getting stronger. A barbell lets you safely add small amounts of weight over time (progressive overload). Note: A power bar is stiff for heavy lifts, while an Olympic bar has more whip for dynamic movements.
The Scalable Garage Gym Equipment List
Think of building your garage gym equipment list in tiers. This aligns with the American Council on Exercise’s principles of functional training, which categorize gear by its movement utility.
Tier 1: The Foundation. This is your Minimum Viable Setup.
- Power Rack/Squat Stand
- Adjustable Bench
- Barbell
- Plates (Bumper or Iron)
- Proper Flooring
This setup lets you perform all the fundamental strength movements safely and effectively.
Tier 2: The Expansion. This adds huge variety.
- Adjustable Dumbbells (save massive space)
- Pull-up Bar (often part of your rack)
- Dip Attachment
- Resistance Bands (for warm-ups, assistance, and banded work)
Tier 3: The Specialization. For targeted goals.
- Cable Machine (for constant-tension exercises)
- Glute-Ham Developer (GHD)
- Sled (for conditioning)
- Specialty Bars (e.g., Swiss Bar, Trap Bar)
Source: American Council on Exercise (ACE) Functional Training and Equipment Guide – https://www.acefitness.org/resources/pros/expert-articles/6432/functional-training-and-equipment-guide/
Phase 4: Maximizing Space with Garage Gym Organization & Storage
An organized gym is a safe and motivating gym. Clutter is dangerous and makes your space feel small. Research in the *Psychology of Sport and Exercise* found that a disorganized environment can make workouts feel harder and reduce your motivation to start. Good garage gym organization solves this.
Actionable Garage Gym Storage Solutions
Here are the best garage gym storage solutions to keep your space clear and functional.
Wall-Mounted Storage (Most Effective):
- This is the #1 rule: Get as much as possible off the floor.
- Use wall-mounted barbell holders, plate tree mounts, and dumbbell racks.
- CRITICAL SAFETY NOTE: All wall storage must be anchored securely into wooden wall studs. Drywall anchors will fail and drop heavy weights on you or the floor.
Vertical Storage:
- Use tall, heavy-duty metal shelving units.
- Store equipment boxes, medicine balls, kettlebells, and gym towels here.
Pegboards & Slatwalls:
- These are the ultimate tool for organizing small items.
- Perfect for resistance bands, lifting belts, straps, chains, speed ropes, and tools.
- They give you a visual, easy-to-access system that keeps clutter off your benches and floor.
Containers & Labeling:
- Use clear plastic bins for loose items: barbell clips, chalk, lacrosse balls, spare bands.
- Label every bin and shelf. This makes cleaning up fast and enforces the “everything has a home” rule.
How to Organize a Garage Gym – A Step-by-Step Method
Use the 5S Methodology from lean manufacturing. It’s a proven system for how to organize a garage gym.
- Sort: Take EVERYTHING out of the space. Only bring back items that are for your gym. Remove old paint cans, holiday decorations, and other clutter.
- Set in Order: Assign a specific, logical home for each item. Bars go on the wall. Plates go on the tree. Bands go on the pegboard. Kettlebells go on the low shelf.
- Shine: Clean the space regularly. Sweep the floor, wipe down equipment, and air it out.
- Standardize: Create simple rules. “Always re-rack weights immediately.” “Spray and wipe the bench after use.”
- Sustain: Make this a habit. A 5-minute tidy-up after each workout maintains your perfect gym environment.
Source: Study on environment and exercise perception from *Psychology of Sport and Exercise* – https://www.sciencedirect.com/science/article/abs/pii/S1469029215000736
Phase 5: Executing Your Plan on a Budget
A world-class training space is possible at any price point. Smart strategies let you build an amazing garage gym on a budget.
Prioritize Your Spending
The home gym community agrees on a spending hierarchy. Invest in this order: Flooring > Rack > Barbell > Plates > Bench. Why? A good foundation and safe, durable core equipment are more important than having lots of cheap, flimsy gear. A great barbell will last a lifetime. A cheap one will bend or break.
Source Used Gear
The secondary market is your best friend. Check Facebook Marketplace, Craigslist, and local fitness resale shops. Commercial-grade equipment from gyms is built to last forever. You can often find amazing deals on iron plates, sturdy racks, and benches. Be patient and ready to move fast for a good deal.
Consider DIY Projects
Some items are perfect for DIY. The strongman and powerlifting communities have shared proven plans for years.
- Lifting Platform: Layer plywood and stall mats for a perfect deadlift surface.
- Plyometric Box: Build a sturdy wood box for jumps.
- Sandbags: Use heavy-duty bags and playground sand for strongman conditioning.
Caution: Only follow well-documented, popular plans for structural items. Safety first. Source: Community wisdom from trusted forums like Starting Strength – https://startingstrength.com/ and EliteFTS – https://www.elitefts.com/
Adopt a Phased Build-Out
This mirrors the exercise science principle of progressive overload. You don’t start by lifting 500 pounds. Don’t start by buying every piece of equipment. Begin with your Tier 1 essentials. As your strength and commitment grow, add a Tier 2 item. Then another. This makes the project manageable, affordable, and purposeful. Your gym evolves with you.
Conclusion: Bringing It All Together
Your dream home gym is within reach. Remember the five-phase process: Plan your space carefully. Floor it with thick rubber for protection. Equip it with essentials first. Organize it using walls and systems. Execute on a Budget with used gear and patience.
A thoughtful garage gym setup is more than just a collection of equipment. It is a personal investment in your health, convenience, and freedom. You are building a space where you can grow stronger for years to come.
Don’t feel like you need everything on day one. Start with your plan. Buy your first essential piece. Build your dream garage gym one step at a time. The journey is part of the reward. Now, go get started.