How to Use a Foam Roller: The Complete Beginner’s Guide to Recovery and Pain Relief
If you have ever wondered how to use a foam roller properly, you are in the right place. Foam rolling is one of the best ways to help your muscles recover after exercise, reduce soreness, and improve your flexibility. Think of it as giving yourself a deep tissue massage at home. Whether you are a beginner who has never touched a foam roller before or someone looking to improve your technique, this complete guide will teach you everything you need to know. We will cover proper foam rolling techniques, the best foam rolling exercises, how to build a foam rolling routine, and exactly how long to foam roll each muscle group. Let’s get started on your journey to better recovery and less muscle pain. source
What Is a Foam Roller? A Guide for the Foam Roller for Beginners
Before we dive into how to use a foam roller, let us first understand what a foam roller actually is. A foam roller is a cylindrical tool made from foam or other dense materials. You use it to apply pressure to your muscles. This process is called self-myofascial release. It helps break up knots, improve blood flow, and speed up muscle recovery. source
Types of Foam Rollers
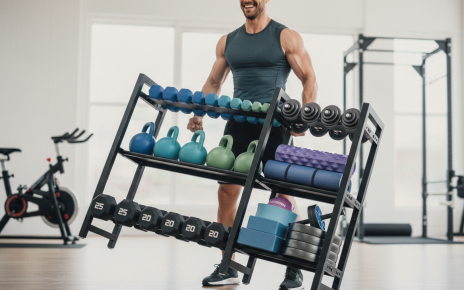
If you are a foam roller for beginners, choosing the right roller is very important. Here are the main types:
- Smooth foam rollers: These are softer and gentler on the muscles. They are perfect for people just learning how to use a foam roller for the first time.
- Textured foam rollers: These have ridges, bumps, or knobs. They provide a deeper massage. You should only use these once you are comfortable with a smooth roller.
- Firmness levels: Foam rollers come in soft, medium, and firm options. Beginners should always start with a soft or medium roller to avoid pain or bruising. source
Common Beginner Fears and How to Overcome Them
Many people feel nervous when they first try foam rolling exercises. Here are some common worries and how to handle them:
- Bruising: If you press too hard with a firm roller, you might get bruises. Start with light pressure and a soft roller.
- Pain: Some discomfort is normal, especially on tight spots. But sharp pain is a sign you should stop or ease up.
- Doing it wrong: This guide will teach you step by step. Just take it slow and listen to your body.
Remember, everyone starts somewhere. The key is to be patient and gentle with your body as you learn how to use a foam roller correctly. source
Proper Foam Rolling Techniques: The Right Way to Roll
Learning proper foam rolling techniques is the most important part of this guide. If you use the wrong technique, you could hurt yourself or waste your time. Follow these steps carefully.
Body Positioning
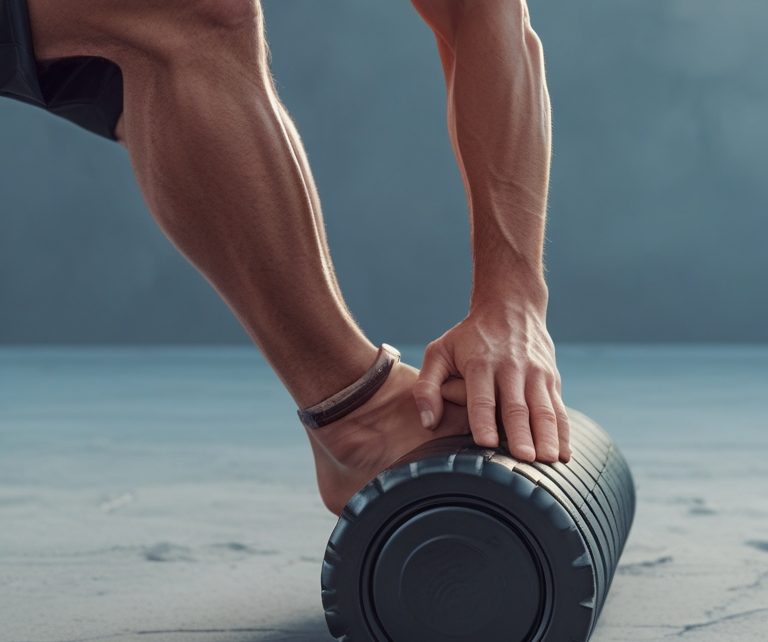
To use a foam roller correctly, you need to control how much pressure you apply. Use your arms and legs to lift some of your body weight off the roller. For example, when rolling your calves, you can use your arms to lift your hips slightly so you are not putting all your weight on the roller. This gives you control over the pressure. source
Breathing Techniques
Breathing is a big part of proper foam rolling techniques. When you breathe slowly and deeply, your muscles relax. This makes foam rolling more effective. Try to take slow breaths in through your nose and out through your mouth. Do not hold your breath, especially when you feel a tender spot. source
How to Find and Treat Trigger Points
Trigger points are tight knots in your muscles that can cause pain. Here is how to find them:
- Slowly roll over the muscle you are targeting.
- When you feel a tender or painful spot, stop.
- Hold gentle pressure on that spot for 20 to 30 seconds.
- Wait until you feel the muscle relax and the pain decrease.
- Then continue rolling slowly. source
Foam Rolling Dos and Don’ts
Here are the golden rules of proper foam rolling techniques:
DO:
- Move slowly and with control at all times.
- Use your body weight to adjust pressure.
- Target the middle of your muscles (the muscle belly).
- Breathe deeply throughout your session.
DO NOT:
- Roll directly over your joints like your knees, elbows, or hips.
- Roll on your lower back. This can strain your spine.
- Roll over acute injuries or areas that are swollen or inflamed.
- Roll too fast. Quick rolling does not help release tight muscles. source
Foam Rolling Exercises for Every Major Muscle Group
Now that you understand the basics, let us get into specific foam rolling exercises for different parts of your body. Each exercise includes a starting position, movement description, and helpful tips.
Calves and Shins
Starting position: Sit on the floor with your legs stretched out in front of you. Place the foam roller under your calves, just above your ankles.
Movement: Use your arms to lift your hips slightly off the ground. Slowly roll from your ankles up toward your knees. Then roll back down. Repeat this motion for 30 to 60 seconds.
For shins: Roll onto your hands and knees. Place the foam roller under your shins. Gently roll back and forth. Be careful not to press directly on the bone.
Tips: If you find a tight spot, hold for 20 to 30 seconds. Point your toes to target different parts of the calf muscle. source
Quadriceps (Front Thighs)
Starting position: Lie face down on the floor. Place the foam roller under your thighs, just above your knees.
Movement: Use your forearms to support your upper body. Slowly roll from your knees up toward your hips. Roll back down. Keep your movements slow and controlled.
Tips: To increase pressure, shift more weight onto the roller. To decrease pressure, use your arms to lift more weight. This is one of the most important foam rolling exercises for runners and cyclists. source
Hamstrings (Back Thighs)
Starting position: Sit on the floor with the foam roller under your thighs. Place your hands on the floor behind you for support.
Movement: Slowly roll from your glutes down toward your knees. Then roll back up. Keep your legs relaxed.
Tips: Do not roll too quickly. The hamstrings can be very tight, so go slow. If you feel sharp pain, ease up on the pressure. source
Glutes and Hips (Piriformis Focus)
Starting position: Sit on the foam roller. Lean slightly to one side so the roller is under your right glute. Place your right ankle on your left knee if you can.
Movement: Roll slowly over your glute muscle. When you find a tender spot, especially deep in the hip area (this is the piriformis muscle), hold for 20 to 30 seconds.
Tips: The piriformis muscle can cause sciatic nerve pain if it gets too tight. This exercise is excellent for relieving lower back and hip tension. Switch sides and repeat. source
Upper Back (Thoracic Spine)
Starting position: Lie on your back. Place the foam roller under your upper back, near the base of your shoulder blades. Bend your knees and keep your feet flat on the floor. Support your head with your hands.
Movement: Slowly roll from the base of your neck down to the middle of your back. Roll back up. Keep your core tight to protect your lower back.
Tips: Do not roll onto your neck or lower back. This exercise is great for improving posture and relieving tension from sitting at a desk all day. source
IT Band (With Caution)
Starting position: Lie on your side. Place the foam roller under your outer thigh, just below your hip.
Movement: Use your arms and your other leg to support some of your weight. Slowly roll from your hip down toward your knee. Roll back up.
Tips: The IT band is a tough band of tissue, not a muscle. It can be very painful to roll. Use light pressure and go slowly. If it hurts too much, stop and try a softer roller. Many experts suggest rolling the muscles around the IT band instead. source
How Long to Foam Roll: Timing Your Sessions Right
One of the most common questions people ask is how long to foam roll each muscle group. The answer depends on your goals, but here are clear guidelines.
Duration per Muscle Group
For each muscle group, roll slowly for 30 to 60 seconds. This gives enough time for the muscle fibers to relax and for blood flow to increase. Do not rush through the movement. Each pass should take about 3 to 4 seconds. source
How Long to Hold on a Tender Spot
When you find a trigger point or tender knot, hold gentle pressure for 20 to 30 seconds. Wait until you feel the muscle release or the pain decrease. If the pain does not go away after 30 seconds, move on. Do not hold your breath during this time. source
Total Session Length
A full-body foam rolling session should last between 5 and 15 minutes. If you are just targeting one or two muscle groups, 3 to 5 minutes is enough. Here is a simple breakdown:
- Quick session: 5 minutes (target 2 to 3 muscle groups)
- Standard session: 10 minutes (target 4 to 6 muscle groups)
- Deep recovery session: 15 minutes (full body with extra time on trigger points)
Signs to Stop or Take a Break
Knowing how long to foam roll also means knowing when to stop. Stop immediately if you experience:
- Sharp or shooting pain
- Numbness or tingling in your limbs
- Increased swelling or inflammation
- Bruising that does not go away
Listen to your body. Foam rolling should feel uncomfortable on tight spots, but it should never cause sharp pain. source
Foam Rolling Routine: Sample Routines for Every Goal
Creating a good foam rolling routine helps you stay consistent and get the best results. Here are three sample routines you can follow.
Beginner Foam Rolling Routine (5 to 10 Minutes)
If you are a foam roller for beginners, start with this simple full-body routine:
- Calves: Roll each leg for 45 seconds.
- Quads: Roll both legs together for 60 seconds.
- Hamstrings: Roll both legs together for 45 seconds.
- Glutes: Roll each side for 30 seconds.
- Upper back: Roll for 60 seconds.
Total time: About 5 to 7 minutes. Repeat this routine 3 to 4 times per week. source
Post-Workout Recovery Routine (10 to 15 Minutes)
Use this routine after your workout to help your muscles recover faster:
- Muscles you worked: Spend 60 seconds on each muscle group you exercised.
- Trigger points: Hold any tender spots for 20 to 30 seconds each.
- Cool down: Finish with 2 minutes of gentle rolling on your upper back and glutes.
Total time: 10 to 15 minutes. Focus on slow, deep rolling. source
Specific Problem Area Routine (5 to 8 Minutes)
If you have a specific tight area, use this targeted approach:
- Warm up: Spend 1 minute rolling the muscles around the problem area.
- Target: Spend 2 to 3 minutes on the tight muscle.
- Hold: Pause on trigger points for 20 to 30 seconds.
- Finish: Spend 1 minute gently stretching the muscle.
Total time: 5 to 8 minutes. Do this daily if needed, but be gentle.
How Often Should You Foam Roll?
For most people, 3 to 5 times per week is a good frequency. You can foam roll every day if you use gentle pressure and listen to your body. Just do not spend more than 15 to 20 minutes per session. Rest days are still important for recovery. source
Common Mistakes and FAQ About Foam Rolling
Even with the best proper foam rolling techniques, people still make mistakes. Here is what to avoid and answers to common questions.
Common Mistakes
- Rolling too fast: Quick rolling does not give your muscles time to relax. Always roll slowly.
- Using too much pressure: More pressure is not always better. Start light and increase gradually.
- Rolling over bones and joints: Never roll directly on your knees, elbows, shins, or spine.
- Ignoring pain signals: If something hurts sharply, stop. Pain is your body’s way of saying something is wrong.
- Holding your breath: Always breathe deeply to help your muscles relax. source
When NOT to Foam Roll
Foam rolling is not safe for everyone or every situation. Do not use a foam roller if you have:
- Acute muscle injuries (like a pulled muscle or strain)
- Broken bones or fractures
- Severe inflammation or swelling
- Blood clots or deep vein thrombosis
- Open wounds or skin infections
- Osteoporosis or brittle bones
Always talk to your doctor or a physical therapist before starting foam rolling if you have any health conditions. source
Frequently Asked Questions
Should foam rolling hurt?
No, it should not hurt. You may feel some discomfort or tenderness on tight spots, but sharp pain means you are pressing too hard or rolling in the wrong place. Back off the pressure and try again gently. source
Can I foam roll every day?
Yes, you can foam roll every day if you do it gently. Many athletes foam roll daily as part of their recovery routine. Just keep sessions short and listen to your body. If you feel sore, take a day off. source
Is foam rolling a replacement for stretching?
No, foam rolling is not a replacement for stretching. It is a complement to stretching. Foam rolling helps release tight knots and improve blood flow. Stretching helps improve flexibility and range of motion. Use both for the best results. source
How quickly will I see results?
Many people feel immediate relief after their first session. However, lasting changes take time. Be consistent with your foam rolling routine for at least 2 to 4 weeks to see significant improvements in mobility and reduced muscle soreness.
Can foam rolling help with cellulite?
Some people claim foam rolling helps reduce the appearance of cellulite by improving blood flow and breaking up fascia. However, there is limited scientific evidence to support this. It may help temporarily, but it is not a cure for cellulite.
Conclusion: Start Your Foam Rolling Journey Today
Now you know exactly how to use a foam roller safely and effectively. Let us quickly recap the most important points:
- Start with a soft or medium foam roller, especially if you are a foam roller for beginners.
- Use proper foam rolling techniques: move slowly, breathe deeply, and never roll over joints or your lower back.
- Practice the foam rolling exercises for each muscle group, holding on tender spots for 20 to 30 seconds.
- Remember how long to foam roll: 30 to 60 seconds per muscle group and 5 to 15 minutes total per session.
- Follow a consistent foam rolling routine 3 to 5 times per week for the best results.
- Listen to your body. Sharp pain means stop. Discomfort is normal, but pain is a warning sign.
Foam rolling is one of the simplest and most effective tools you can use to improve your muscle recovery, reduce pain, and feel better in your body. The key is to start slow, stay consistent, and keep learning. Every time you roll, you are helping your muscles heal and perform better.
Your turn: Have you tried foam rolling before? What muscle group gives you the most trouble? Share your experience in the comments below. And if you found this guide helpful, share it with a friend who is just getting started with their fitness journey. For more tips on recovery, mobility, and staying healthy, explore our other guides on self-care and fitness wellness. Happy rolling!